A little bit about me.

I love tutorials. If I follow a tutorial, even if I don't do it perfectly, I always link to theirs. All photographs are mine, are never taken from the original tutorial, and are never as good as the original.

Tuesday, December 28, 2010

Baby Moccasins


These Baby Moccasins are just the most adorable things. I used the pattern from The Purl Bee for Whit's Knits Baby Mocs, with a few changes. First, I used the yarn I had left over from the Drops Baby Cardigan that I finished a while ago, Lion Brand Wool-Ease Thick and Quick. I used the color 'fisherman' for the body of the moc and 'blossom' for the accent color. I bought a bunch of the blossom for a blanket that I haven't started yet. Since the wool yarn is much thicker than the pattern calls for, I used my size #8 dpns to knit with (this yarn actually calls for a #13, but the pattern is written on #2 and #4). You can see where the gauge would be severely off.

In case you're interested in doing it my way, with a 4 stitch gauge instead of a 6 stitch gauge, e-mail me for the changes I made to the Purl Bee's pattern.


Posted by Picasa

This post will be linked at:


Tuesday, December 14, 2010

Nestie Exchange Ornaments

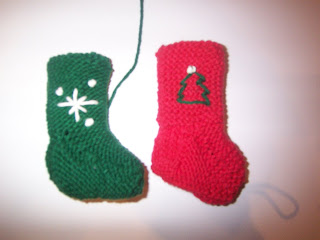
A while back, I entered a Secret Santa Handmade Ornament Exchange. After going through a bunch of patterns on Ravelry, I decided to go for the Alpaca Sox Mini Socks. I chose this pattern for several reasons - the first being the raves and comments from the other users on Ravelry's forum. I've learned that whenever there are a ton of questions about a pattern, there is usually a misprint or some other issue with the pattern. Second, I'd never knit a sock before, and this pattern used mostly familiar stitches while introducing only a few new ones. So I could feel familiar, but still learn something new without being completely lost. Finally, there really isn't a gauge for this pattern. I mean, nobody's going to wear it, so it didn't really matter what kind of yarn I used.


I used the Lily Sugar n Cream yarn in four different colors, including the two Twists. I like the Lily yarn for project like this, it's easy to handle and cheap.

Items purchased:
4 balls of yarn (JoAnn's)
Size 6 double pointed needles (Michael's)

What did my Secret Santa give me? I got these adorable snowmen ornaments representing my family. I love them! I'm not going to 'out' my Santa, because she doesn't have a blog herself. But you know who you are! Thanks!


Posted by Picasa


This post will be linked at:


Sunday, December 12, 2010

It's beginning to look a lot like Christmas!

These wreaths are all over the place, so I can't really take credit for the idea. But I can take credit for my way of doing it! I started out with a wreath form and two differed sizes of Styrofoam balls, yarn and a bunch of ornaments.

Wrapping the Styrofoam balls takes a lot more yarn than you'd think. I used my entire stash of red and green yarn. It's also harder than it looks - I thought this would be an easy one hour project, but it probably took an hour just to get the balls wrapped up. After figuring out the first one, the rest just followed course. You want to be careful not to use too much yarn or your Styrofoam balls are going to get really big really fast.

Next comes my friend, the hot glue gun. Hot glue your yarn balls to the wreath form, then start with the ornaments. I used the largest ones first, then the medium sized, ending with the smallest ornaments to cover up any holes. The ornaments need to be glued in several spots to make sure they're secure.
Hang your wreath on the door and enjoy!

Posted by Picasa
Items purchased:
Styrofoam balls, 2 sizes (Dollar General)
Red ornaments, various sizes (Dollar General)
Wreath form and hook (AC Moore)

Items owned:
Yarn from stash used
Hot glue gun and sticks
Green ornaments, two sizes


This post will be linked at:


Monday, December 6, 2010

Felt Advent Calendar

I've been doing the Advent Calendar Sew-Along with Homemade by Jill, albeit a little (okay, a lot) behind her schedule.

Overall, I'm okay with how it's turning out. I'm going to wait to bind the edges until I get a sewing machine, and the ornaments sure turned out cute. You can definitely tell which ones I started out with though - I learned how to blanket stitch for this project, and the ones I completed at the end, although more complicated, look nicer because of the confidence of my stitches.


The pockets should be embroidered with the numbers. I'd finished about 1/3 of the sewing when my OCD took over. I didn't like the way the stitches looked, especially on the curvier numbers, like the 3 and the 8. I ripped out all of my stitches, thinking my handwriting looks better than that! And the bell went off. I had to go to JoAnn's to pick up some buttons for the baby cardigan, so I swung by the crafting aisle and picked up a white fabric paint pen. In about half the time it took me to sew those 1/3 squares, I had all of the squares painted and sitting to dry. The only way the pockets could look better is if I had used a better quality felt.


I think this white mitten is my favorite.


Or maybe the peppermint.


Posted by Picasa
I don't normally work with felt, or embroidery floss. Everything from this project I had to buy from scratch, which is why mine aren't as colorful as I'd like.
Items purchased:
2 bags assorted felt - red, green, white and black (Dollar General) - these are not recommended. I used these on the pockets, which are kind of flimsy. There is a definite difference in the quality of this felt and the ones I bought elsewhere. I might re-do the pockets at another time.
2 large pieces of felt - white, green (Michael's, AC Moore)
Assorted smaller rectangles of felt - brown, yellow, glitter white (Michael's, JoAnn's)
Green, white and red embroidery thread (AC Moore)
Red beads (AC Moore)
White paint pen (JoAnn's)
Red and green ribbon (Michael's)
Items owned:
Dowel (left over from Thanksgiving Tree project)
Black embroidery thread


This post will be linked at:


Pictures are also posted on the Homemade by You flikr page.

Wednesday, December 1, 2010

The House of Night Series by P.C. Cast and Kristin Cast


OF

This is technically a review of seven different books, so for record-keeping, these are 102 through 108. The House of Night series is a young adult series consisting of: Marked, Betrayed, Chosen, Untamed, Hunted, Tempted, and Burned. The eighth installation to the series is due to be coming out shortly.

YA books are like candy for me. They're short and sweet, often plot-driven and fast moving. A 300 page YA book takes no time at all to read, and the conflict often begins on the first page, instead of beginning with character descriptions - which, although often necessary, always drags for me.

In the first book, the main character Zoey becomes a vampire. In this reality, vampires are accepted in society and are 'chosen' from humans to become vampires by a goddess - no biting involved. The series follows Zoey as she enters a vampire school (the House of Night in Tulsa) and has adventures of her own. There are two main antagonists, who often work in conjunction with one another. A character that I absolutely hated at the beginning of the series became my favorite by the third book.

Things I liked about this series:

-Zoey is portrayed as beautiful and smart. This may seem like an insignificant thing, but in the majority of YA novels right now, the main female character is either average or on the downside of average, and attentions bestowed upon her are seen as gifts or like she somehow doesn't deserve them.
-Zoey is quick to make friends, and those friends are very different from one another. They kind of remind me of the kids on Glee.
-There is a homosexual relationship that isn't highlighted. It just... is. I find this refreshing, these boys are treated just like the other characters, and that's how it should be. Usually these relationships are placed in the text as part of turmoil or to make a point. This relationship isn't used in that fashion, or in any fashion, really.
-The mean girl. Seriously, she's got the best one-liners.

Things I didn't like about this series:

-Zoey cries a lot. A LOT. It's annoying.
-The centering on religion. Zoey's stepfather belongs to an ultra-conservative Christian church, and she believes that all Christians are horrible. Much of the books involve worshipping the goddess that marks humans to become vampires and worshipping the elements. I'm not incredibly religious, and some of the comments left me feeling a little funny. But, it's fiction. It's a made-up religion.
-The boy drama gets old. Without giving away too much, there's an inappropriate relationship between a student and a teacher, and it just didn't seem to add a lot to the story. It was more for shock value than real value. But maybe that's just me.

Each book gets somewhere between 3 and 4 stars, on a scale of 5.

This series is available from Amazon.com, but I got mine from my local library.

Monday, November 29, 2010

Baby Cardigan, completed.

Remember this project? I'm done! This baby cardigan is the first knitting project I've done that sizing actually matters, and, boy does it! I used the Drops Design pattern for the Hooded Cardigan in Eskimo, and Lion Brand Yarn Wool-Ease Thick and Quick in Fisherman. I really love the yarn, it's so thick and warm, and since the yarn was so thick it didn't take nearly as long as I thought it would. In fact, I just bought several skeins in a different color to make a blanket for my toddler's upcoming big-girl bed.

I had a few issues with the pattern, especially with some badly-translated decreases. Luckily, all of my questions had already been answered on forums at Ravelry.com, meaning it wasn't really my problem but really was an issue with the wording (whew!).

Also, a note to self, if the pattern says at the bottom 'Don't forget to make buttonholes', then really, don't forget to make the buttonholes. Although in my opinion this reminder should go at the top of the pattern, not the bottom. Because yes, I forgot to make the buttonholes. I ended up with these cute long giraffe buttons and some short peices of I-cord, making a toggle-type button. I hope it works.

Now for the sizing. I did not use the Drops yarn recommended in the pattern. However, the yarn I did use is the exact gauge as that yarn. The majority of stitches in this pattern aren't measured by number of stitches, but by the length. So I am very sure that I executed the 0-3 month sizing correctly. Since I'm due at the end of December, this sweater MIGHT fit her at the end of winter. Or over several hundred layers. But in reality it will probably fit her in the middle of June. Which makes me a little sad.

Items purchased:

3 skeins Lion Brand Yarn, Wool-Ease Thick and Quick in Fisherman (Michael's)
1 package (contains 2) giraffe buttons (JoAnne's)

Size 13 knitting needles

Items owned:

I used a thinner white yarn (Lily Sugar and Cream) to sew the seams so that they wouldn't be super bulky.

Posted by Picasa


This post will be linked at:


Sunday, November 21, 2010

Thanksgiving Tree Centerpiece

The Thanksgiving Tree centerpiece has been rattling around in my brain for awhile. I've looked around for some inspiration, and came across Thanksgiving Trees on two of my favorite blogs, The Hostess With the Mostess and Crap I've Made. I am in absolute love with both of these ideas, and really couldn't decide which one I wanted to do. So... I did them both.
Kind of.
My Thanksgiving Tree was done during several days of hour-ish blocks of time, since that's what I usually have to work with.

Step 1: Constructing the Tree.

My husband is a carpenter, and since I like all of my fingers, I don't drill or saw anything. He cut up two wooden dowels for me, which he said was a pain because he had to do it by hand. The tree trunk is a fatter dowel, cut to 2 feet. The limbs are a skinnier dowel, cut to: one 12 inch, one 8 inch, one 6 inch and one 4 inch. The trunk has holes drilled in at a 45 degree angle at varying spots for each limb. I didn't really measure these, but they take up the top foot of the dowel.
I inserted the limbs into the larger dowel and secured with wood glue, then left it to dry.
Then I went to work on the vase. I used a block from the floral section of my local craft store to fill the vase, then used double-sided tape to adhere paper to the outside of the vase.


Here's what it looks like now.

The vase.

Par 2: The Ball Ornaments, or How Not to Paint Something Round.
I could not, for the life of me, find green or orange ball ornaments. So I did the next best thing - I bought gold and silver ornaments and green and orange paint. I used My Studio acrylic paint in Old Ivy and Folk Art acrylic paint in Pumpkin. I hung the ornaments to be painted from the tree with yarn and painted away. My method worked, but if you can think of something better I'd do that instead. The hanging ornaments enabled me to use only two coats of paint, and for them to dry evenly without any weird 'laying on one side' pooling. I did have some issues with the ornaments touching the yarn, and swinging and hitting each other. The green ornament and the orange ornament closest to each other got repainted several times. I am really happy with the way the paint dried. I was worried about streaks, but by the time they dried the streaks were gone or barely noticeable.
So, I got the job done, but was really annoyed half the time.

Balls a-dryin'.

Step 3: Get the Glue Gun.


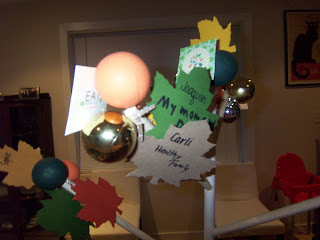
I placed the Ball Ornaments on each of the limbs and on the top of the tree. Since we are having a table of 13 people for Thanksgiving dinner, I also glued on 13 mini-clothespins.


I also glued on the band around the vase, I used the Grateful Mod printables from The Hostess with the Mostess napkin ring to go around the center of the vase, and the cupcake toppers for the center. I don't have a 2" punch like she used, so mine are all square.
Then, I filled the vase (to cover the green floral sponge) with coffee beans. They smell good and were on hand.

Example of the 'cupcake toppers'.

Step 4: The Thankful leaves.
Okay, you remember those mini-clothespins? Here's a cutout of my maple leaf stencil. The plan is to use cut out maple leaves as placeholders, and ask each of the 13 people at my table to write one thing that they are thankful for. Then the maple leaves will be clipped to the clothespins on the tree.


Here's what it will look like, in theory. These are the colors I've picked out for the leaves.


Have a Happy Thanksgiving!!!

EDITED!
One of the place settings. I cut the stock paper out (very carefully!) and wrote each person's name on it, then placed it in the center of the plate.


Black sharpies were placed around the table, then the diners were given instructions on how to attach their placecards to the tree.

All in all, it turned out well. We had a couple over-eager diners resulting in a couple broken clothespins, and at least one clothespin was glued on in such a way that only the skinniest fingers could open it. I'm definitely keeping this idea around for next year.

This post will be linked at:


Posted by Picasa