Kind of.
My Thanksgiving Tree was done during several days of hour-ish blocks of time, since that's what I usually have to work with.
Step 1: Constructing the Tree.
My husband is a carpenter, and since I like all of my fingers, I don't drill or saw anything. He cut up two wooden dowels for me, which he said was a pain because he had to do it by hand. The tree trunk is a fatter dowel, cut to 2 feet. The limbs are a skinnier dowel, cut to: one 12 inch, one 8 inch, one 6 inch and one 4 inch. The trunk has holes drilled in at a 45 degree angle at varying spots for each limb. I didn't really measure these, but they take up the top foot of the dowel.
I inserted the limbs into the larger dowel and secured with wood glue, then left it to dry.
Then I went to work on the vase. I used a block from the floral section of my local craft store to fill the vase, then used double-sided tape to adhere paper to the outside of the vase.
Par 2: The Ball Ornaments, or How Not to Paint Something Round.
I could not, for the life of me, find green or orange ball ornaments. So I did the next best thing - I bought gold and silver ornaments and green and orange paint. I used My Studio acrylic paint in Old Ivy and Folk Art acrylic paint in Pumpkin. I hung the ornaments to be painted from the tree with yarn and painted away. My method worked, but if you can think of something better I'd do that instead. The hanging ornaments enabled me to use only two coats of paint, and for them to dry evenly without any weird 'laying on one side' pooling. I did have some issues with the ornaments touching the yarn, and swinging and hitting each other. The green ornament and the orange ornament closest to each other got repainted several times. I am really happy with the way the paint dried. I was worried about streaks, but by the time they dried the streaks were gone or barely noticeable.
So, I got the job done, but was really annoyed half the time.

Balls a-dryin'.
Step 3: Get the Glue Gun.

I placed the Ball Ornaments on each of the limbs and on the top of the tree. Since we are having a table of 13 people for Thanksgiving dinner, I also glued on 13 mini-clothespins.
I also glued on the band around the vase, I used the Grateful Mod printables from The Hostess with the Mostess napkin ring to go around the center of the vase, and the cupcake toppers for the center. I don't have a 2" punch like she used, so mine are all square.
Then, I filled the vase (to cover the green floral sponge) with coffee beans. They smell good and were on hand.
Example of the 'cupcake toppers'.
Step 4: The Thankful leaves.
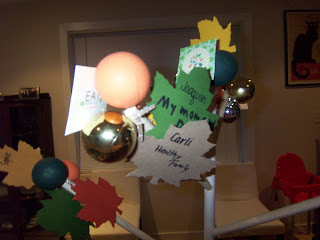
Okay, you remember those mini-clothespins? Here's a cutout of my maple leaf stencil. The plan is to use cut out maple leaves as placeholders, and ask each of the 13 people at my table to write one thing that they are thankful for. Then the maple leaves will be clipped to the clothespins on the tree.
Here's what it will look like, in theory. These are the colors I've picked out for the leaves.
Have a Happy Thanksgiving!!!
EDITED!
One of the place settings. I cut the stock paper out (very carefully!) and wrote each person's name on it, then placed it in the center of the plate.

Black sharpies were placed around the table, then the diners were given instructions on how to attach their placecards to the tree.
All in all, it turned out well. We had a couple over-eager diners resulting in a couple broken clothespins, and at least one clothespin was glued on in such a way that only the skinniest fingers could open it. I'm definitely keeping this idea around for next year.
This post will be linked at:


You have too much free time. You actually MAKE the projects, I just think about them
ReplyDeleteThank you for linking up your project at http://sewwoodsy.blogspot.com/! Make sure you stop by this Wednesday for another edition of What's Up Wednesdays!
ReplyDelete