A little bit about me.

I love tutorials. If I follow a tutorial, even if I don't do it perfectly, I always link to theirs. All photographs are mine, are never taken from the original tutorial, and are never as good as the original.

Monday, November 29, 2010

Baby Cardigan, completed.

Remember this project? I'm done! This baby cardigan is the first knitting project I've done that sizing actually matters, and, boy does it! I used the Drops Design pattern for the Hooded Cardigan in Eskimo, and Lion Brand Yarn Wool-Ease Thick and Quick in Fisherman. I really love the yarn, it's so thick and warm, and since the yarn was so thick it didn't take nearly as long as I thought it would. In fact, I just bought several skeins in a different color to make a blanket for my toddler's upcoming big-girl bed.

I had a few issues with the pattern, especially with some badly-translated decreases. Luckily, all of my questions had already been answered on forums at Ravelry.com, meaning it wasn't really my problem but really was an issue with the wording (whew!).

Also, a note to self, if the pattern says at the bottom 'Don't forget to make buttonholes', then really, don't forget to make the buttonholes. Although in my opinion this reminder should go at the top of the pattern, not the bottom. Because yes, I forgot to make the buttonholes. I ended up with these cute long giraffe buttons and some short peices of I-cord, making a toggle-type button. I hope it works.

Now for the sizing. I did not use the Drops yarn recommended in the pattern. However, the yarn I did use is the exact gauge as that yarn. The majority of stitches in this pattern aren't measured by number of stitches, but by the length. So I am very sure that I executed the 0-3 month sizing correctly. Since I'm due at the end of December, this sweater MIGHT fit her at the end of winter. Or over several hundred layers. But in reality it will probably fit her in the middle of June. Which makes me a little sad.

Items purchased:

3 skeins Lion Brand Yarn, Wool-Ease Thick and Quick in Fisherman (Michael's)
1 package (contains 2) giraffe buttons (JoAnne's)

Size 13 knitting needles

Items owned:

I used a thinner white yarn (Lily Sugar and Cream) to sew the seams so that they wouldn't be super bulky.

Posted by Picasa


This post will be linked at:


Sunday, November 21, 2010

Thanksgiving Tree Centerpiece

The Thanksgiving Tree centerpiece has been rattling around in my brain for awhile. I've looked around for some inspiration, and came across Thanksgiving Trees on two of my favorite blogs, The Hostess With the Mostess and Crap I've Made. I am in absolute love with both of these ideas, and really couldn't decide which one I wanted to do. So... I did them both.
Kind of.
My Thanksgiving Tree was done during several days of hour-ish blocks of time, since that's what I usually have to work with.

Step 1: Constructing the Tree.

My husband is a carpenter, and since I like all of my fingers, I don't drill or saw anything. He cut up two wooden dowels for me, which he said was a pain because he had to do it by hand. The tree trunk is a fatter dowel, cut to 2 feet. The limbs are a skinnier dowel, cut to: one 12 inch, one 8 inch, one 6 inch and one 4 inch. The trunk has holes drilled in at a 45 degree angle at varying spots for each limb. I didn't really measure these, but they take up the top foot of the dowel.
I inserted the limbs into the larger dowel and secured with wood glue, then left it to dry.
Then I went to work on the vase. I used a block from the floral section of my local craft store to fill the vase, then used double-sided tape to adhere paper to the outside of the vase.


Here's what it looks like now.

The vase.

Par 2: The Ball Ornaments, or How Not to Paint Something Round.
I could not, for the life of me, find green or orange ball ornaments. So I did the next best thing - I bought gold and silver ornaments and green and orange paint. I used My Studio acrylic paint in Old Ivy and Folk Art acrylic paint in Pumpkin. I hung the ornaments to be painted from the tree with yarn and painted away. My method worked, but if you can think of something better I'd do that instead. The hanging ornaments enabled me to use only two coats of paint, and for them to dry evenly without any weird 'laying on one side' pooling. I did have some issues with the ornaments touching the yarn, and swinging and hitting each other. The green ornament and the orange ornament closest to each other got repainted several times. I am really happy with the way the paint dried. I was worried about streaks, but by the time they dried the streaks were gone or barely noticeable.
So, I got the job done, but was really annoyed half the time.

Balls a-dryin'.

Step 3: Get the Glue Gun.


I placed the Ball Ornaments on each of the limbs and on the top of the tree. Since we are having a table of 13 people for Thanksgiving dinner, I also glued on 13 mini-clothespins.


I also glued on the band around the vase, I used the Grateful Mod printables from The Hostess with the Mostess napkin ring to go around the center of the vase, and the cupcake toppers for the center. I don't have a 2" punch like she used, so mine are all square.
Then, I filled the vase (to cover the green floral sponge) with coffee beans. They smell good and were on hand.

Example of the 'cupcake toppers'.

Step 4: The Thankful leaves.
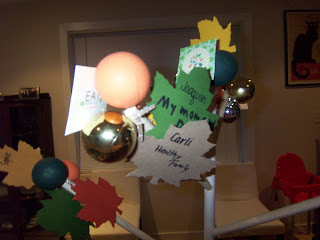
Okay, you remember those mini-clothespins? Here's a cutout of my maple leaf stencil. The plan is to use cut out maple leaves as placeholders, and ask each of the 13 people at my table to write one thing that they are thankful for. Then the maple leaves will be clipped to the clothespins on the tree.


Here's what it will look like, in theory. These are the colors I've picked out for the leaves.


Have a Happy Thanksgiving!!!

EDITED!
One of the place settings. I cut the stock paper out (very carefully!) and wrote each person's name on it, then placed it in the center of the plate.


Black sharpies were placed around the table, then the diners were given instructions on how to attach their placecards to the tree.

All in all, it turned out well. We had a couple over-eager diners resulting in a couple broken clothespins, and at least one clothespin was glued on in such a way that only the skinniest fingers could open it. I'm definitely keeping this idea around for next year.

This post will be linked at:


Posted by Picasa

Monday, November 15, 2010

Fingerpainting Fun!

I saw this design somewhere, but didn't bookmark it. So I can't take credit for this amazing idea.


Start out with any sized canvas and one color of fingerpaint. We used Melissa and Doug's red.


After the fingerpainting came to an end, I used a foam brush to completely cover the canvas, then we made the handprints.


I set this out to dry for a little over a day.


And hung it on the wall with a past fingerpainting project.


Items purchased:
Canvas (AC Moore)
Foam brushes (AC Moore)
3M wall hangers

Items owned:
Red fingerpaint (Melissa and Doug)
Black Sharpie

Time spent: Roughly 1 hour, not including drying or hanging time

Difficulty: Very easy


This post was shared at:


Wednesday, November 10, 2010

The Vampire Lestat by Anne Rice

OF


My goal for 2010 was to read 100 books. I met my challenge with my last book, Bag of Bones by Stephen King. Instead of setting a new goal for myself, I'm just going to continue being an overachiever. :)

Book #101 for 2010 was The Vampire Lestat by Anne Rice. I read the first book in this series, Interview with a Vampire, and had traded to get the second two books The Vampire Lestat and The Vampire Armand, which sat on a shelf for a very long time. I dug them out intending to read them during the RIP V challenge, but... life happened. I had a couple books come in from the library that I wanted to get through first.

The Vampire Lestat is the story of Lestat, first introduced as Louis's maker in Interview with a Vampire. It begins with Lestat's re-awakening in 1984, then goes waaaay back in time to when Lestat was a human, telling the story of how he became a vampire and the stories of a couple older vampires.

This book, while containing a lot of action, is more character-driven than plot-driven. We are able to see how Lestat changes and becomes what and who he is, as well as how Louis's depiction of him in the first book was inaccurate and unfair. I really enjoy Rice's writing style, but this book did have several dragging parts. I didn't fly through it like I did Interview.

3/5 stars

This book is available from Amazon.com, but my copy is from Paperbackswap.com, where you can trade books you no longer need for credits to get books from other readers.

Tuesday, November 9, 2010

Crafty for the Holidays

Check out some of my favorite Holiday Events around the Web!

Each button is a hyperlink. Enjoy!


Haul out the Holly,Gwenny Penny,Christmas craft tutorials


Saturday, November 6, 2010

Baby Cardigan Preview!

Here are 4 of the pieces of my baby cardigan. I'm working on the sleeves right now, and the back needs some correction because the decreases look weird when you put it all together. I really like the yarn I'm using - it's Lion Brand Wool-Ease Thick and Quick in Fisherman, with size 13 needles.
Posted by Picasa

Tuesday, November 2, 2010

Planting garlic

Here in VA we've already had our first frost, but it's still getting warm during the daytime. Which means that it's the perfect time to plant garlic!
I bought 2 heads of elephant garlic at the Merrifield Garden Center back when I bought my flower bulbs. They cost 85 cents each, and contained a lot of cloves.

Step 1: Seperate the cloves.
Step 2: If your garlic hasn't been treated for fungus, soak the cloves in 1 tablespoon of baking soda and water for about an hour. I wasn't positive if mine had been treated or not (I forgot to check) so I went ahead with the soaking anyway.

Step 3: Plant the cloves pointy-side down about 2 inches deep. I found contradictory information on how close to plant garlic in the square-foot garden I started this year, so I did two squares of 9 cloves and one square of 6 cloves. We'll call this an experiment for next year.

Step 4: Cover with about 4 inches of mulch, straw or leaves. Since my garden is still somewhat active, I didn't do this step yet. I'll put a good layer of leaves and straw on when I put the garden to bed for the winter.
Step 5: WAIT! The garlic won't be ready until early summer, around June. But there will be scapes before that, which are just awesome in pesto.

Monday, November 1, 2010

Halloween around the web

Here are some projects that I loved that I would like to place on the schedule for next year.

What Allie's Making Now made this adorable Flying Lessons sign. I've had it on my 'Upcoming Projects' list for a while now, and I just ran out of time.


I would love to do a bloody entrance (we have a window that looks just like this one) like Muse Lodge's Bloody Mess.


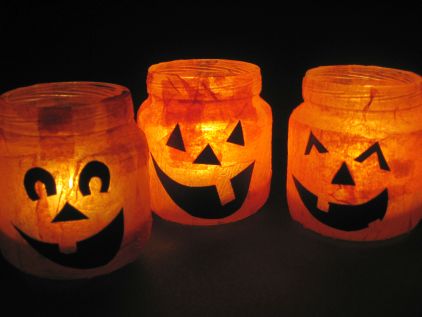
I am loving all of the Halloween luminaries I've seen this season. This one is from Skip To My Lou.
These are from Crafts By Amanda, and use canning jars instead of votives.


These Spray Painted Pillows by Maria from You Craft Me Up are truly inspired. I love her tutorials, they are very explicit and user-friendly.

I'm definitely going to give The Hostess With The Mostest's Fur Ball Monsters a try.

I actually printed out the template for Martha Stewart's Craft Department's Halloween silouettes, but ran out of steam.

Arachnophobia and other decorations

It's about time I posted our Halloween and Fall decorations. I wanted to have them all in the same place so that nothing would get lost.

Fake spiderwebs and these glorious orange and black spiders are making appearances around our house. Both from Michael's.

Party centerpieces. Pumpkins and squash are real (the squash is actually from my garden). One glass vase is filled with black and orange spider rings, white skull rings and purple bad rings. The shorter vase is filled with ping pong ball "eyes". Vases are left over from other events, rings and eyeballs are from Michael's.

I was attempting to get a better view of the display skull. It's a styrofoam skull (Michael's) on a platter (Haviland china, my great-grandmother's), underneath an upside-down vase.

Laundry door spiders and web. The web is white yarn, the spiders are created using Sew Woodsy's online tutorial.

I used 2" puffballs and glitter felt (you can't actually see the felt, it's just what I had on hand).

Cut the felt into roughly the same shape and size as your puffball. Hot glue 4 pipe cleaners on each side, add more glue and press the puffball into the center of the felt circle.

Attach googly eyes!


Items purchased:
4 2" puffballs, smaller black puffballs, googly eyes (Michael's)
Black pipecleaners (Michael's)
White yarn (Michael's)
Already owned:
Black felt
Hot glue gun
Time spent: Roughly 20 minutes for 4 spiders, 5-ish minutes to hang the spider web
Difficulty: Very easy.

The painted pumpkins on the table were created by a toddler at a birthday party.


This was a wonderful idea, kept the kids busy and was a project that multiple ages could participate it. Sophie painted two pumpkins, a sugar pumpkin and a mini-pumpkin. A blast was had by all.